Showing posts with label Halloween. Show all posts

Friday, October 23, 2015

Halloweenin'

Hello! First, the Indianapolis city guide is up and you can see it here. They included a lot of my photos. See if you can find me (I'm in a reflection, oops).

 Now, on to Halloween.
Eyeball plant stakes

I'm/we're doing a sci fi theme this year with monster plants. I have a small container garden's worth of faux potted plants and an assortment of plant stakes to enhance the live plants already present. This idea came along because I saw a great DIY from the prop master of Home and Family and I am a plant hoarder year round so it goes well with what's already on hand.

The image above is some of the stakes stuck in a rosemary plant. The stakes are easy and minimal. I used sticks from the yard, spray paint, 1.5" styrofoam balls, spackle, acrylic paint, and gloss coating. Find some sticks and paint them green. water down some spackle and coat the foam balls, allow to dry overnight. Spray them with white paint. Then I painted they eye with acrylic paints. I made a circle and watered down the paint in the center to create a darker outer ring. Once that dried a bit, I used the end of a paintbrush dipped in black to make the pupil. Then I let that dry and sprayed them with a few coats of gloss. After the gloss dried, I used a glue gun to attach the eye to sticks. On the first ones I added leaves and green fringe, but I decided I liked the minimal look best. Drying is slow, but assembly is quick so this project offered some instant gratification and that was nice after making larger carnivorous plants.

Here are the foam balls drying. I have a fancy system of discarded packaging and toothpicks.

This photo shows some of the process and that my cat is very helpful. I put the balls on toothpicks before coating them and stuck them in some packaging to stay upright while drying. I also kept them this way to while painting. I removed the toothpicks when it was time to assemble everything.

I'll have some more prop photos and DIY's after proper pictures are taken. If you would like some inspiration, try these sites:

There is still so much to do... make plant slime, sew a costume, paint more eyeballs, set up lights, etc.
xoxo,
b


Monday, November 3, 2014

Halloween 2014!

It snowed!  WTF?  Snow and ice and rain... aaarrrrggghh.  

A husband and wife pumpkin couple.

The weather on October 25th was like summer.  We spent some time walking around the Historic Irvington Halloween Festival in our home made costumes.  I totes felt like I was in a parade even though we didn't actually stay and join in the costume parade.

The Halloween banner at work.
We did Halloween at work on the 30th and it was pretty great.  I made a last minute banner out of burlap, twine, and paper.  After I hung it up I wondered why it had taken me so long to utilize this big, blank wall.

Halloween night the weather was unkind.  There was snow, and ice. and wind, and rain; and I was so very unprepared for it.  I heard it would be cold and maybe rainy, but I was so unprepared for snow and ice.  I also believe that I was firmly in denial about the weather until my hands were completely numb.  So I ran home and my friend finished trick or treating with the kids.

xoxo,
b

Tuesday, October 21, 2014

I forgot something...

I made a wreath for the door.  It's based off this tutorial and uses the Happy Halloween banner from this tutorial.

crow wreath
You can't see it in the night time photos, but it's lovely.  I tied strips of burlap around a wire form and then sewed a few to fill in spots.  I added some wide bird print ribbon for a hanger, pulled the feet off a fake crow, and distressed my printed banner.  I printed the banner on a textured grey card stock and then I did some stamping and painting to make it feel worn.  I added cork to the paper so it would have some dimension.  The original instructions are all in the first tutorial link and just do your thing from there.

Okay, now I think I'm done.
xoxo,
b

Halloween House Decorating Contest 2014

Hello, hello!
Last night was the house judging for the north portion of the neighborhood.  I went with an Alfred Hitchcock "The Birds" theme this year.  I also decided to go all out and make myself part of the display.  I covered myself in fake blood and dropped on the lawn; bird attacked woman of Bodega Bay.
 Oh, Blogger is having some formatting issues!
Anyway, happy haunting!
I hear the book is better than the movie, xoxo
b
Close up of the porch at night.
Me before I took my place in the yard.

Birds as high as I could reach.

Wednesday, October 9, 2013

The 2013 Cube is up!


This year my faux office is spending October dressed as a pumpkin patch.  There are hay bales, crows, and all the cardboard pumpkins you can handle.  The house will also be a pumpkin patch this year.  I decided to carry my theme through and make everything interchangeable.


I wanted something that would make a large impact without costing too much.  I looked at lots of decorative lawn stakes and thought they were great, but it's expensive to buy very many and the large ones are out of my budget anyway.  So I raided the recycling at my house and at work.  I drew some rough gourd shapes and cut them out.  I used a combination of acrylic and spray paint to bring them to life and then I got out the glue gun to build pumpkins with all of my painted pieces.  As long as I have spray paint and cardboard, I will have decorations.  I will also have feet covered in over spray.

xoxo,
orange and glittered
 b

Thursday, October 3, 2013

It's October!

Hello!  It's October!  First though, the 2013 Room for Color winners are in!  Um, once again, not it, but also once again, I didn't participate to win (although it would be nice).  Go take a look at the winning rooms.

Back to October...

The decorations are slowly going up.  I have a paper pumpkin assembly line in my living room and I have a theme.  This year I'm doing pumpkin patches, but probably a haunted pumpkin patch for the house and a cutesy patch for the faux office.

2013 Halloween wreath


I used scavenged materials from Octobers past to make a wreath.  I also painted the face of the pumpkins with glow paint, but I have no idea if it's actually working.  I like it.  I bought two wire wreath frames from the thrift store a while ago so I might make another one or just wait and do a general Fall wreath.
All Hallows Mess
Here you can see a variety of projects piled together.  A sewing pile on the dress form, a witch hat waiting to be hung, and the first 3 pumpkins in my faux pumpkin patch.  Right now I am very much into DIY decorative lawn stakes.  They make a big impact and as long as there are boxes to recycle and acrylic paints, I can make them.  I just glue sticks to the back and pop them in the ground.

Lawn stakes from Amazon.
Above are the decorations that I ordered.  They're a little smaller than I expected, but they're nice.

Mums
Don't forget the mums!  I ran out of nice planters to put them in, so here's a festive grocery bag.  It's rustic right?  the colors work.  I put a drip tray in the bottom so I'm not ruining the bag.  I was content with my thrifty solution.

Pumpkin Pouf
Over the summer, I bought a 20lb box of Poly-Fil.  If you aren't familiar with this product, that's A LOT of Poly-Fil (more than I realized).  So I've been making poufs and cushions.  Of course all of the outdoor poufs are in my summer colors and patterns.  I wanted to keep them on the porch because we use them a lot, but I wanted to include them in my fall decorating.  The Great Pumpkin Pouf cover is the solution.  I'm also going to try to make some black cat floor cushions, but those aren't done yet.  Pumpkin pouf is a giant fabric pumpkin, but I didn't have to stuff it because I slid my outdoor pouf inside, tied it with twine, and then wrapped the excess fabric in green to make a stem.  You follow the basic instructions for fabric pumpkins, but you use a piece of fabric large enough to cover your pouf.  Then you skip a few of the sewing steps; I rubber banded the bottom closure instead of sewing and I just wrapped twine around the pouf to make the pumpkin segments (for the fabric pumpkin you would sew through the center of the form, but that just isn't going to work for something this big).

xoxo, 
pumpkin patch
b

Monday, September 23, 2013

Lately

Hola,

I've been working on Halloween costumes and the Telephone project.  I also transitioned the porch to fall (it felt too early to do Halloween, but I am so ready) and started the course to become a certified Master Gardener (two classes in and I already feel behind, but I already know so much more about soil).  I've managed to watch a ton of Adventure Time and Regular Show through all of this.  Busy, anyway, here...

The start of my first yarn tail, thank you Deviant Art.  It looks as if Deviant Art is where it's at for cat tutorials.
Almost all the pieces.

Makeup test, but this isn't my costume so this was just kinda' to try it out.  I'm not so great at makeup/face painting.
Trying to find something that works for the lady because it is her costume and she hates face paint... non-committer.
xoxo,
 busy b

Friday, November 9, 2012

Halloween Hold-over

Okay kittens, I've been a time management mess lately. So please excuse my absence, but in my chaos I've decided to keep Halloween around for awhile.  This means I'm still making costumes and crafts. Eventually I'll move on to Christmas, but does anyone else ever feel like Christmas is a big holiday bully?  It's always crowding the others and overshadowing their presence; it always creeps in just a little too early.  Well, that needs to stop.  I also tend to feel like the general public doesn't accept an extensive Halloween celebration, but they'll overlook the overzealous celebration of Christmas.  Also, be honest, those light up lawn decorations have nothing to do with being good Christians so it isn't about being religious either.  The flashy holiday celebration is pure commercialization.  Just admit you like the pretty lights and presents.  This concludes my unscheduled rant.

Anyway, let's look at what's been happening during the great Halloween hold-over of 2012...

Life Aquatic Costume Pieces
I don't believe I ever showed you how the Team Zissou shoe DIY turned out.  I'm content with it and it was much cheaper than buying the actual shoes.

Spider web poncho
Next up is this poncho.  I have two versions of it going.  This is the one that I prefer.  The other is my first effort.  I'll finish them both and model it up later.  The poncho is inspired by this one I found while aimlessly browsing (aka collecting visual research).  It's out of stock, but it's also out of my price range.  I'll show you my version of this too when everything is finished.

Fancy Bat
Then came Fancy bat and the kitty cat attack on sewing...

Napping with the fabric.

Complicatting the fabric cutting.
Lining my fancy wings.

Making progress...
Occasionally, they got up and I was able to work.  At other times, they attacked my marking pens and my sewing thread.  The wings feel like a blanket and I suppose they'll end up being sort of quilted.  I cut the fleece wrong in the beginning so it became a liner fabric as opposed to a finish fabric.  Now my wings have some weight and will probably keep me warm (because you know when I'm dressed as a bat in December, I don't want to be cold.).  Tonight it will be on to pressing, top stitching and the addition of piping.  Oh, and I should also add some sort of closure.

Here's hoping for more organization and better photos soon (my camera is repaired and shipping back to me today!).
xoxo,
B

Wednesday, October 24, 2012

The wig is done!


Sewing piles
There was a lot of the above for a few days.  Numerous piles of 12 strands each ready to be lined up and sewn.  This was probably the most un-fun part of yarn wig making, but...  It's over now!
Getting the character involved a bit.
Now there's a big pile of long and luxurious wig.  If my face were blue this might be more convincing...  Anyway, it ended up taking less time than I had anticipated (which is great because I still have the rest of the costume to mend) and less yarn.  The original tutorial used 2 skeins of yarn and although I wasn't using the same kind of yarn, I went with two as well because I was making a long wig for a larger child (my daughter almost the same size as me currently).  I was wrong.  Also, I should add that I did follow the first part of the Jasmine wig tutorial exactly, but I wasn't sure how far onto the wig cap she sewed the yarn.  I started sewing at the front edge of the stalking cap (I put the tag in the back) and I had enough yarn to give full coverage once I got to the end of the crotch seam (which should be roughly in the middle of the cap).  If I had added more yarn past this point, I'm not sure if it would have laid properly and it might have become too heavy.  The point is, you can stop sewing there or a little earlier if you're planning to let the hair hang.

1 skein + is how wrong I was.
Now comes the debate; do I dare attempt a return without a receipt (and to be technical their return policy does say that this can be done for store credit) or do I find a use for all this extra yarn?  I don't know how to knit, but I suppose you can do other things with yarn.

Now that we have the wig, I want to give her a proper Sally blue face.  Also, this doesn't work.  Pinterest fail.

XOXO,
b

Sunday, October 21, 2012

Sally Wig


Hello!  Today the Lady Bean is away with a friend so I will be working on her Halloween costume.  She's wearing a costume that I made for myself around 10 years ago.  Although my skills have superimproved since then, the costume is still good enough not to re-make, the wig however, was never what I wanted.  I'm going to mend little bits on the dress and maybe add a few details that I wasn't able to add then.  I'm also adjusting the fit for her, but crazy enough, she's almost the same size I was when I wore it... Creepy.

 
Once upon a time, in a land several hours away, I made a costume based on the original Sally doll.  It was very last minute and super low budget, but it was great (except for the wig).  The wig was awful though.  I was in a hurry and all I could find was a red braided pigtail rag doll wig.  I took the braids out and kept trying to arrange the hair, but it never worked.  So now, I have time and more funds to devote to the project.  I am following the first part of this tutorial and today it's time for sewing.  I'm a little nervous, but I did get one bundle of yarn measured and cut.
 
This is only a test.

 
Anyway, I should do this and quit writing about it or playing in the yarn.
 
XOXO,
The Might B

Tuesday, October 9, 2012

Halloween at the Cube

Hello!  It's 2012 Halloween season and I bring you....
Cube life
Washi webs!!  Add flocked 3D spiders (from Target) for extra fun!  Woot!
Candy bucket and ballet advertisement.

(No one knows this.)

I love transitional decor.  It's the best.  I also like to change up the space that spend hours upon hours in.  This year I wanted something a little more splashy for my work area, but easy and friendly.  I opted to washi tape (currently obsessed).  It's easy to remove, won't cause any damage, and affordable.  The spiders I have up are $4 a pack from Target, but I might make some more out of black paper/ felt/ foam.  Glitter anyone?  Anyway, I hope to decorate at home this weekend and I'd like to see your decorations too.

XOXO,
B

Thursday, September 27, 2012

Halloween Costume Preview


Rain
A little sparkle.
A lot of shine.  

A little squish.

"Brooke, what are you going to be?"  I doubt if you're thinking that.  Anyway, what this preview tells me is that I need to start taking real photos again.  The instant gratification of Instagram has gotten to me, but look at that last photo; so crisp, so clear, so nice.

xo,
 Miss B

Tuesday, August 28, 2012

My Brain on Halloween

Today I am preoccupied by Halloween.  I like to start preparing early and then finish at the last minute.  It's my favorite.  That stuff is bigger than Christmas.
Mr. Husband as a cloud on Halloween 2011.
 I've been thinking of recycling this cloud costume that I made last year for Mr. Husband.  It's like a sandwich sign pillow.  There's also a headband and a couple of bolts of lightning (he's pointing one at the camera).  I really like the cloud, but I would have to go further with it.


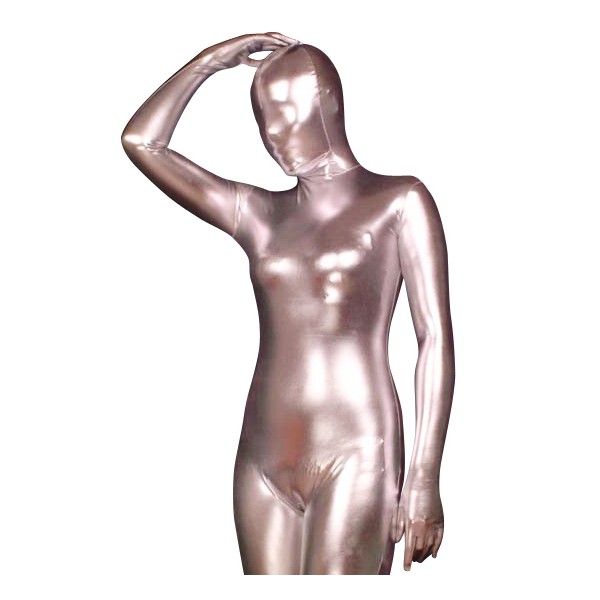
Metallic silver Zentai suit
I need something perfect to go underneath that cloud like maybe some sort of morph suit-bodysuit thing.  Unfortunately, Morph suits have a big logo across the back of them, but Zentai suits don't.  So imagine me as a fluffy white cloud with a metallic silver body.  I'll have a face opening too because that just seemed a little better than not having one and it seemed a little more funny.

rain drops
lightning bolt
Then I'm going to need props; I'm going to make some rain drop garland and carry the lightning bolts.  My bolts are silver, but they are roughly the same size as the one in the picture.

What do you think?  I can't decide what to do about the feet though.  Should I have silly over sized white feet or something discreet?  Oh, decisions...

xoxo,
B

Friday, December 16, 2011

Oh little blog...

How I have neglected you.  It's been 4 months and although I thought of you from time to time, I did not visit.  Let's catch up in pictures.


This was big and it happened 9 days after my last post.  I was in a panic and then I became a wedding machine.  (Also, yes, my ring does emit holograms.)


Athena turned 10 and we had a back yard party.
 

Halloween happened and it featured the best lemon cupcake ever.


Now we're on to wedding details: Merry-Miller, Making Memories 2012.

I have many crafties and other things to write about so hopefully I'll visit more often.
xoxo

Tuesday, November 9, 2010

Costume Remorse


We did Halloween and Miss Bean took my original costume idea. So for awhile I thought I might be nothing since there were so many other things to do and finish (for example a long over due commissioned Uncle Sam suit). Of course, I couldn't resist and I finally gave in. I even spent money on costume items when I assured myself that I wouldn't. I guess it was okay and Bean was happy, but I was disappointed this year that I wasn't more excited and I ended up with costume remorse. I think I would enjoy a totally eccentric ensemble or going super traditional next year (Zombie!).


What I learned though:


1. Saucony shoes are very comfortable and I was right thinking that I would like them. My Halloween costume was a great excuse to finally purchase them.


2. Don't trust the estimated shipping time. Athena's wig arrived a week late and we had to borrow one at the last minute.


3. Neither of us wants to wear a wig again.


4. There is a place that actually makes button eye costume props.


5. I have a future making novelty oven mitts.


Finished commission, Halloween pair, Oven mitt prowess